
There is a reason homemade apple pie never really goes out of style. A crisp, golden crust wrapped around warm apples, cinnamon and brown sugar is simple enough to feel familiar, but getting all the little details right makes a noticeable difference.
This homemade apple pie recipe uses a double crust and a filling made with tart apples, brown and granulated sugar, cinnamon, ginger and nutmeg. The goal is a pie with tender apples that still have some texture, plenty of spiced flavor, and a filling thick enough to stay inside the slice instead of running across the plate.
The recipe itself isn’t complicated, but apple pie rewards patience. Choosing the right apples, slicing them evenly, waiting until the filling is actually bubbling, and allowing the finished pie to cool before cutting it are all more important than they may seem.
What Makes a Good Homemade Apple Pie?
For me, the best apple pie is about balance.
The filling shouldn’t be overwhelmingly sweet. Apples should still taste like apples, which is why tart varieties work so well here. Brown sugar brings a deeper caramel-like sweetness, while cinnamon, ginger and nutmeg add warmth without overpowering the fruit.
Texture matters just as much. If the apples become completely soft, the filling can feel almost like applesauce. If they’re too firm, the pie can seem underbaked. Thin, relatively even slices make it much easier to hit the middle ground.
Then there is the crust. It should be golden and crisp enough to contrast with the soft filling underneath.
The Best Apples for Apple Pie
Firm, tart apples are a particularly good choice because they can withstand a relatively long baking time without immediately falling apart.
Granny Smith is an obvious option, but you don’t necessarily have to use a single variety. Mixing tart apples with a sweeter, aromatic variety can make the filling more interesting.
Whatever you choose, the important thing is to use apples that remain reasonably firm when baked.
Try to slice them to roughly the same thickness as well. If some pieces are paper-thin and others are chunky, they’ll cook at very different rates.
How to Keep Apple Pie From Becoming Watery
A runny apple pie can be frustrating because it often looks perfect until the first slice is removed.
There are three things worth paying attention to.
First, the flour in the filling acts as a thickener, so measure it rather than adding it casually.
Second, don’t remove the pie from the oven simply because the crust looks brown. Look through the vents or lattice. The filling should be visibly bubbling. That’s a much better indication that the filling has reached the temperature needed to thicken properly.
Finally, let the pie cool.
Cutting into a piping-hot apple pie is tempting, but the filling continues to set as it cools. Give it at least two hours if you want slices that hold together much better.
How to Prevent the Crust From Browning Too Quickly
Apple pie needs quite a long time in the oven, and occasionally the crust gets ahead of the filling.
That doesn’t mean the pie has to come out.
If the edges or top are becoming sufficiently brown while the filling still needs more time, loosely cover the browned areas with aluminum foil and continue baking.
This allows the apples and filling to finish cooking without turning a beautifully golden crust into a burnt one.
Lattice Crust or Full Top Crust?
Either works with this recipe.
A traditional full top crust is probably the easiest option. Just remember to cut several vents into the dough so steam can escape.
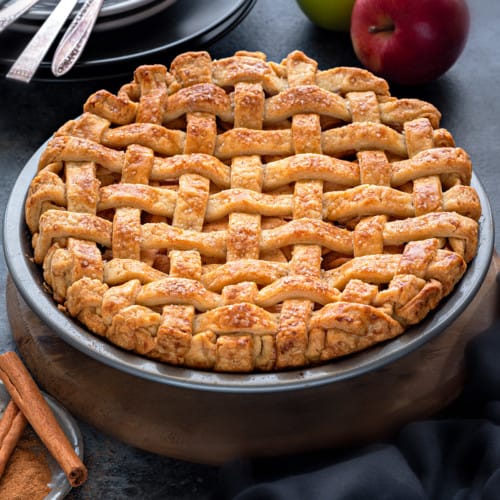
A lattice crust takes a little more work, but it has one practical advantage beyond appearance: you can easily see what the filling is doing while the pie bakes.
If you can see the apple filling bubbling between the strips, you’ll have a much better idea of when the pie is actually ready.
Don’t Skip the Cooling Time
This might be the hardest instruction in the entire recipe.
Your kitchen smells like cinnamon and baked apples, the crust has just come out of the oven, and I’m telling you not to eat it yet.
But waiting makes a difference.
Straight from the oven, the filling is extremely hot and relatively fluid. As the pie rests, it cools and thickens. After around two hours, you’ll have a much better chance of cutting a clean slice rather than watching the filling immediately spill out.
You can always gently warm an individual slice later if you prefer your apple pie warm.
What to Serve With Homemade Apple Pie
The pie is perfectly good on its own, but there are several classic additions that work particularly well.
Vanilla ice cream gives you the familiar contrast between warm pie and cold, creamy ice cream. Lightly whipped cream is a less sweet alternative, while a little caramel sauce turns it into a richer dessert.
And yes, there’s also the old combination of apple pie and sharp cheddar cheese. It sounds unusual if you’ve never tried it, but the salty cheese provides an interesting contrast to the sweet, spiced apples.
Storing Leftover Apple Pie
Once completely cooled, cover the leftover pie to keep the crust from drying out.
It can be kept at room temperature for a short period, or refrigerated if you want to store it longer. Individual slices can be gently reheated before serving.
Homemade Apple Pie Recipe
8
servings30
minutes1
hour10
minutes1
hour40
minutesThis homemade apple pie combines a warmly spiced apple filling with a crisp, golden double crust. Tart apples help keep the filling balanced rather than overly sweet, while cinnamon, ginger and nutmeg add classic fall flavor. Serve the pie slightly warm or at room temperature, on its own or with a scoop of vanilla ice cream.
Ingredients
1 . double-crust pie dough, enough for one 9-inch pie
1/3 cup granulated sugar
1/3 cup packed brown sugar
1/4 cup all-purpose flour
1 teaspoon ground cinnamon
1/4 teaspoon ground ginger
1/4 teaspoon ground nutmeg
6-7 cups tart apples, peeled, cored and thinly sliced
1 tablespoon lemon juice
1 tablespoon butter, cut into small pieces
1 Large egg white
1 tablespoon coarse or turbinado sugar, optional
Directions
- Prepare the bottom crust:
Preheat the oven to 375°F (190°C). On a lightly floured surface, roll out half of the pie dough into a circle large enough to fit a 9-inch pie plate. Transfer the dough to the plate and gently press it into the bottom and sides. Refrigerate while you prepare the filling. - Mix the dry ingredients:
In a small bowl, combine the granulated sugar, brown sugar, flour, cinnamon, ginger and nutmeg. Mix well so the spices are evenly distributed. - Prepare the apple filling:
Place the sliced apples in a large bowl and toss them with the lemon juice. Add the sugar and spice mixture and toss again until the apple slices are evenly coated. Transfer the filling to the prepared pie crust and dot the top with the butter. - Add the top crust:
Roll out the remaining dough and place it over the filling. Trim the excess dough, seal the edges and crimp as desired. Cut several small slits in the top crust to allow steam to escape. Alternatively, cut the dough into strips and make a lattice top. - Finish and bake:
Lightly beat the egg white until foamy and brush it over the crust. Sprinkle with coarse sugar if desired. Bake on the lowest oven rack for 60–70 minutes, or until the crust is deeply golden and the apple filling is visibly bubbling through the openings in the crust. If the edges brown too quickly, loosely cover them with foil. - Cool before slicing:
Transfer the pie to a wire rack and allow it to cool for at least 2 hours before slicing. This resting time helps the filling thicken and makes the pie much easier to cut cleanly.
Notes
- How do I know when the pie is done?
Don’t judge the pie by the crust alone. The filling should be visibly bubbling through the steam vents or lattice before you remove it from the oven. If the crust is already well browned but the filling isn’t bubbling yet, loosely cover the top with foil and continue baking. - Choosing the apples!
Tart, firm apples work particularly well because they hold their shape during the long baking time and balance the sweetness of the filling. You can also combine two apple varieties for a more complex flavor and texture. - Storage and freezing
Store leftover apple pie covered at room temperature for up to 2 days or refrigerate it for longer storage. The pie can also be frozen. Wrap it well once completely cooled and thaw it before gently reheating.
Frequently Asked Questions
Why is my apple pie filling runny?
The pie may have been removed from the oven before the filling was thoroughly bubbling, or it may have been sliced while still too hot. The filling thickens both during the final stage of baking and while the pie cools.
Do I have to peel the apples?
For this version, I recommend peeling them. Apple skins don’t soften at exactly the same rate as the flesh and can leave a noticeably different texture in the finished filling.
Can I make the apple pie ahead of time?
Yes. In fact, apple pie is particularly convenient for this because it needs plenty of cooling time anyway. You can bake it earlier in the day and serve it once the filling has completely set.
Why did my pie crust become too dark?
The crust can brown before the apple filling has finished cooking. Instead of taking the entire pie out early, loosely protect the browned areas with foil and continue baking until the filling is bubbling.
Should homemade apple pie be served hot?
It doesn’t have to be. Warm or room-temperature pie is often easier to slice than pie served immediately from the oven. If you want the warm-pie-and-ice-cream combination, reheat individual slices briefly before serving.