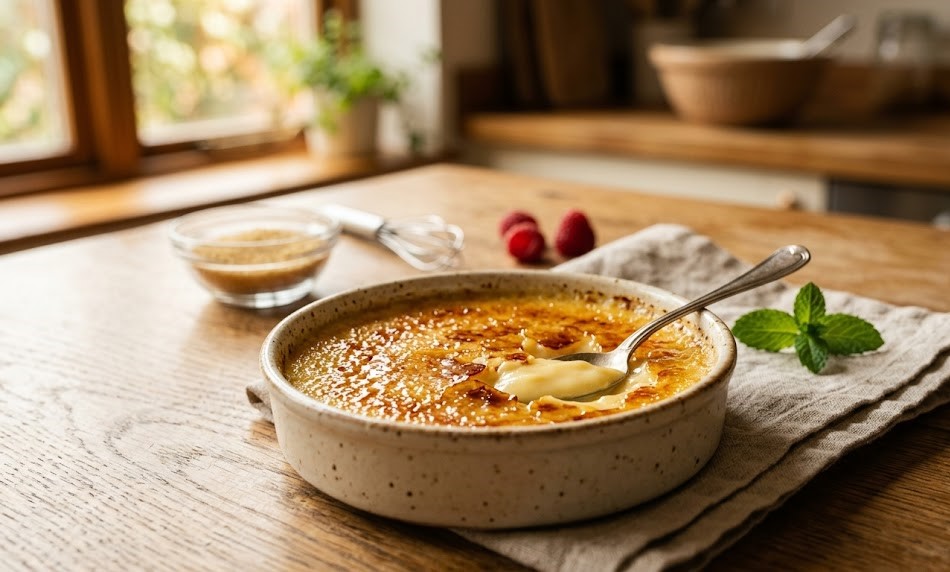
If you are looking for an easy creme brulee recipe that yields restaurant-quality results, you have come to the right place. Believe it or not, this decadent French classic only requires five basic ingredients. Below the incredibly satisfying, crackly caramelized sugar crust lies a velvety smooth vanilla custard that is guaranteed to wow your dinner guests!
Gather a handful of basic pantry and fridge staples to whip up these elegant little pots of custard. In our quick video tutorial, I demonstrate exactly how to use a kitchen torch to achieve that signature glass-like sugar top.
Easy Creme Brulee Recipe
Don’t let the fancy name intimidate you! You can absolutely conquer this sophisticated dessert right in your own kitchen using just 5 straightforward ingredients and a handheld torch. It is remarkably beginner-friendly. In fact, my teenagers frequently whip this up on the weekends (with a little supervision when the fire comes out, of course).
In French, Crème Brûlée (pronounced “krem-broo-lay”) literally translates to “burnt cream.” It consists of a lavishly rich custard base that gets blanketed with a thin layer of granulated sugar. Using a culinary torch, that sugar is melted until it caramelizes into a rigid, shatteringly crisp crust.
Creme Brulee Ingredients
Check your refrigerator and pantry; you likely already have these five everyday ingredients ready to go for your homemade dessert!
Heavy Whipping Cream – This is crucial! The high fat content of heavy cream is what allows the custard to set into a rich, spoonable texture. For a dairy-free twist, full-fat canned coconut milk or coconut cream is a great substitute.
Egg Yolks – Yolks are the thickening agent here, giving the dessert its signature dense and creamy body.
Granulated Sugar – Standard white sugar works beautifully for both sweetening the custard base and melting into the crunchy topping.
Fine Sea Salt – Just a pinch cuts through the richness and enhances the overall flavor profile.
Vanilla – You can use a high-quality pure vanilla extract, vanilla bean paste, or the scraped caviar from a fresh vanilla bean pod.
Expert Flavor Tips:Substituting Vanilla: If you are swapping formats, remember that 1 teaspoon of standard vanilla extract roughly equals 1 teaspoon of vanilla bean paste, or the scraped seeds of one whole vanilla bean. Flavor Variations: Once you master the classic vanilla, try infusing the cream with espresso powder or pumpkin pie spices to match the season!
How to Make Crème Brûlée
Crafting homemade vanilla creme brulee is incredibly straightforward. Here is the step-by-step breakdown:
Heat the cream – In a saucepan, gently warm the heavy cream until it just begins to steam (do not let it boil). Remove it from the heat and stir in the vanilla.
Combine yolks and sugar – In a separate mixing bowl, vigorously whisk the egg yolks, granulated sugar, and salt. Then, temper the eggs by very slowly pouring the hot cream into the egg mixture while whisking continuously.
Strain the mixture – Pass the liquid custard through a fine-mesh strainer. While optional, this removes any accidental cooked egg bits and guarantees a silky-smooth finish. Divide the liquid evenly among six 4-ounce ramekins, setting them inside a large baking dish.
Prepare the water bath – Carefully pour boiling water into the baking dish until it reaches halfway up the outside of the ramekins. This water bath (or bain-marie) ensures the eggs cook gently and evenly. Bake at 325°F for 30 to 35 minutes. (Baking time will increase if using wider/larger ramekins). You will know they are ready when the edges are set but the center still jiggles slightly when gently shaken. Overbaking leads to a rubbery, flan-like texture. Remove from the water, cool on a wire rack, cover, and chill in the fridge for a minimum of 2 hours.
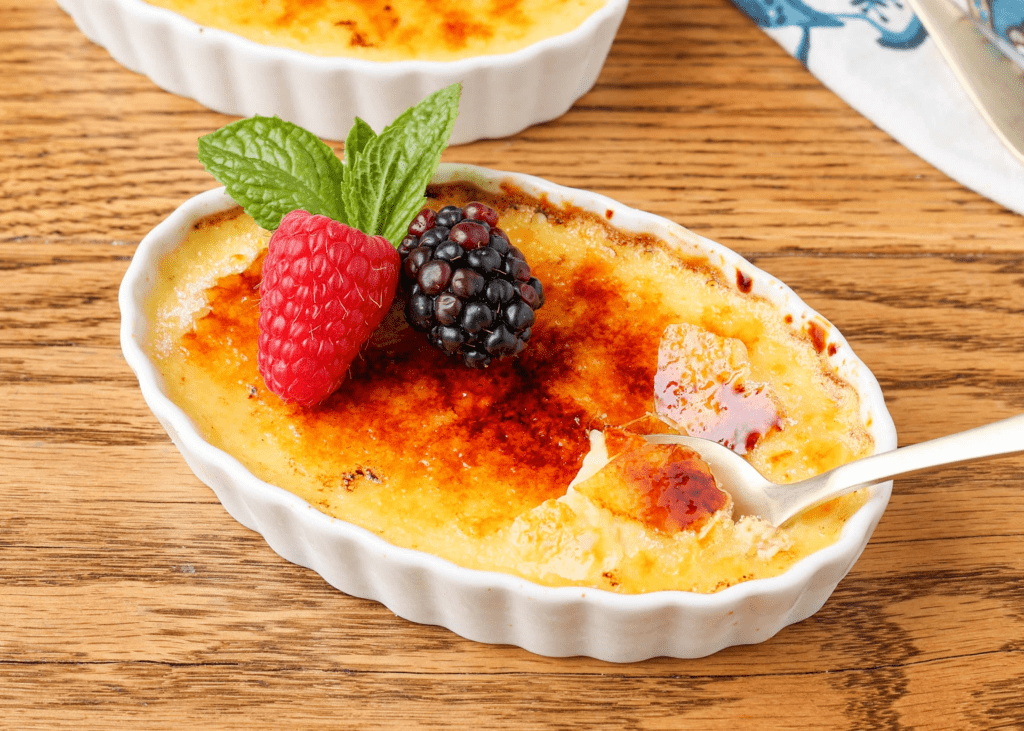
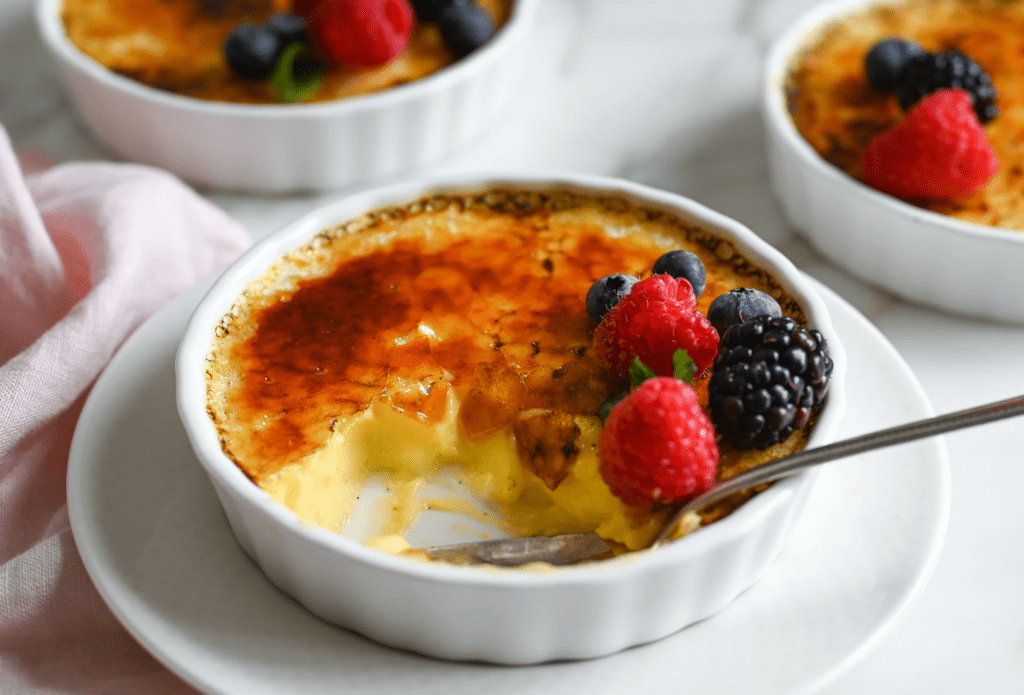
Caramelize the crust – Right before serving, sprinkle about 1 1/2 to 2 teaspoons of sugar evenly across the surface of each chilled custard. Light your kitchen torch and move it in slow, continuous circles over the sugar until it melts and turns a gorgeous deep amber.
Pro Tip: You do not need to buy an expensive culinary torch! A standard, multi-purpose butane torch from the local hardware store works exceptionally well for this job.
Can I Make Creme Brulee Without a Torch?
While you will miss out on the ultra-satisfying “thwack” of breaking the sugar glass with your spoon, there are workarounds. I have tested the oven broiler method to melt the sugar, but the results are notoriously uneven and often end up warming the chilled custard too much. To save yourself the headache, skip the crust entirely and garnish with these delicious alternatives:
Fresh Berries – Raspberries, blackberries, or sliced strawberries paired with a sprig of mint.
Citrus Segments – Bright orange or grapefruit slices along with freshly grated zest.
Sweet Syrups – A generous pour of salted caramel or butterscotch sauce.
Chocolate – Use a vegetable peeler to shave dark chocolate directly over the custard.
1/2 cup granulated sugar (plus more for the topping)
1 pinch fine sea salt
1 tsp pure vanilla extract (or vanilla bean paste)
Directions
Heat the Cream: Preheat your oven to 325°F. In a medium saucepan over medium heat, warm the heavy cream, stirring occasionally. Once it is steaming and just barely reaching a simmer, remove it from the burner and stir in the vanilla.
Whisk the Eggs: In a separate medium-sized mixing bowl, whisk together the 5 egg yolks, 1/2 cup of sugar, and the pinch of salt until well combined. Whisking continuously, pour the hot cream into the egg mixture in a very slow, thin stream so you don’t accidentally scramble the yolks.
Strain and Pour: Pour the combined mixture through a fine-mesh sieve into a large measuring cup or pitcher (discard any solids left in the sieve). Pour the custard evenly into six 4-ounce ramekins. Place the ramekins into a 9×13-inch baking dish.
Bake in a Water Bath: Pour boiling water into the 9×13 dish, being careful not to splash the custards, until the water level reaches halfway up the sides of the ramekins. Bake at 325°F for 30-35 minutes. They are done when the edges are set but the dead-center still has a slight wobble. Carefully remove the ramekins from the hot water and let them cool on a wire rack to room temperature. Cover with plastic wrap and chill in the refrigerator until fully set (at least 2 hours, or up to 3 days).
Torch the Sugar: Just before you plan to eat, sprinkle 1 ½ to 2 teaspoons of sugar evenly across the top of each chilled custard. Ignite a blowtorch and hold the flame slightly above the sugar, moving it in a circular motion until the sugar melts and turns a rich amber color. Let it sit for a minute to harden, then serve.
Notes
Ramekin Size: If you are using wider or deeper ramekins, you may need to extend the baking time by 5-10 minutes. Look for that signature center-wobble to know when they are done.
No Torch? If you lack a blowtorch, skip the sugar crust and garnish with fresh raspberries, shaved dark chocolate, or a drizzle of caramel sauce instead.


